How to use OneMap Website
A guide to using widgets
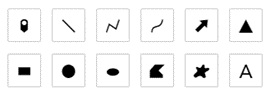
Draw Widget
The Draw widget allows you to draw simple graphics and
text on the map. You can also use it to add line distance or polygon area to the feature as
text. This widget provides basic sketching and markup functionality. It also displays some
measurements for drawn features, such as length for lines and area and perimeter for polygons.
When the widget initially opens, a window appears that contains the following draw tools:
- • Point
- • Line
- • Polyline
- • Freehand polyline
- • Arrow
- • Triangle
- • Rectangle
- • Circle
- • Ellipse
- • Polygon
- • Freehand polygon
- • Text
How Use the Draw widget
To get started with the Draw widget, complete the following steps:
- • Click a button to select the drawing mode.
- • Optionally change the drawing style using the symbol picker.
- • For points, select the marker category (different symbols are available in each
category) to set the symbol size, colour, transparency, outline colour, and outline
width of the symbol. Only the size field is available for picture marker symbols.
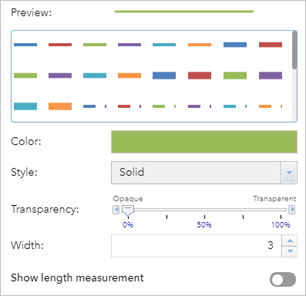
- • For lines, select a predefined symbol from the box. You can also customize the
colour, style, transparency, and width of the symbol.
- • For polygons, select a predefined symbol from the box. You can also customize the
fill colour, transparency, outline colour, and outline width of the symbol.
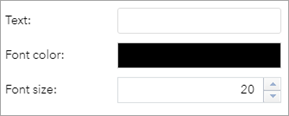
- • For text, type in the Text box, and select a font colour and size for the text.
- • Optionally show a corresponding measurement in the map for the point location,
line length, or polygon area or perimeter. You can also choose a unit of measurement and
set the font colour and size for the text.
- • Draw the desired features and text on the map.
- • Click Undo or Redo to cancel or repeat your drawings or click Clear to remove
them all from the map.
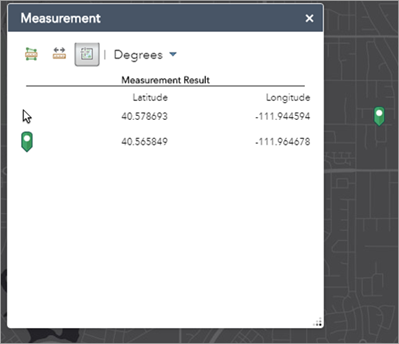
Measurement Widget
The Measurement widget allows you to measure the area of a polygon or length of a
line or find the coordinates of a point.
How to use the Measurement widget
Click the Measurement widget icon to open it.
Location measurements
Click the Location button  and click a location on the map.
The Measurement widget displays the coordinates for the point in degrees (decimal). To change
the coordinate display format to degrees/minutes/seconds, change the selection in the
Degrees drop-down menu to DMS.
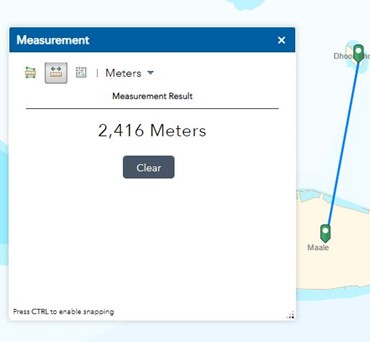
Distance measurements
- 1. Click the Distance button.
- 2. Draw a polyline on the map by clicking two or more points.
- 3. Double-click to finish drawing the polyline.
The Measurement widget displays the total length of the polyline using the defined
Default Length Unit.
To change the length unit, select the applicable unit of measure from the
Meters drop-down menu.
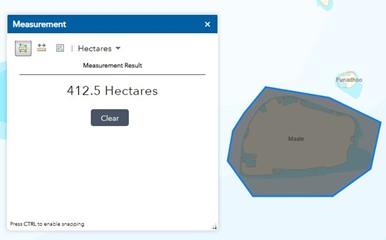
Area measurements
- 1. Click the Area button.
- 2. Draw a polygon on the map by clicking three or more points.
- 3. Double-click to finish drawing the polygon.
The Measurement widget displays the total area of the polygon using the defined
Default Area
Unit. To change the area unit, select the applicable unit of measure from the
Hectares
drop-down menu.
Measurement Widget
The Measurement widget allows you to measure the area of a polygon or length of a
line or find the coordinates of a point.
How to use the Measurement widget
Click the Measurement widget icon to open it.
Location measurements
Click the Location button and click a location on the map.
The Measurement widget displays the coordinates for the point in degrees (decimal). To change
the coordinate display format to degrees/minutes/seconds, change the selection in the
Degrees drop-down menu to DMS.
Distance measurements
- 1. Click the Distance button.
- 2. Draw a polyline on the map by clicking two or more points.
- 3. Double-click to finish drawing the polyline.
The Measurement widget displays the total length of the polyline using the defined
Default Length Unit.
To change the length unit, select the applicable unit of measure from the
Meters drop-down menu.
Area measurements
- 1. Click the Area button.
- 2. Draw a polygon on the map by clicking three or more points.
- 3. Double-click to finish drawing the polygon.
The Measurement widget displays the total area of the polygon using the defined
Default Area
Unit. To change the area unit, select the applicable unit of measure from the
Hectares
drop-down menu.
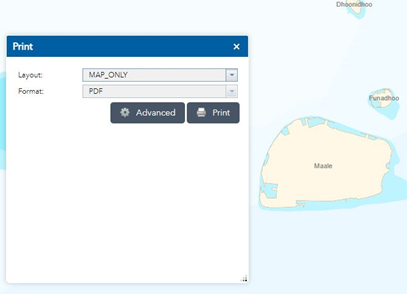
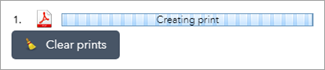
Print widget
The Print widget connects the web app with a printing service to allow the current
map to print.
How to use the Print widget
- 1. Click the Print button to open the Print widget.
- 2. Select the applicable Layout and Format for the exported map.
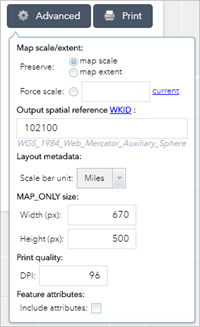
- 3. Click Advanced to open a menu with advanced print options.
- 4. After all options have been set with the applicable values, click Print to submit all
information to the print service.
- 5. A progress bar displays next to the executing task.
- Upon completion of the print job, a link to the print output displays.
- 6. Click the task to open the file in a new window.
- 7. Click Clear prints to clear the print history.
Distance and Direction widget
The Distance and Direction widget allows you to draw lines, circles, ellipses, and
range rings to visualize important information.
How to use the Distance and Direction widget
You can use the Distance and Direction widget to create lines, circles, ellipses, or rings.
Change the input coordinate format
The Distance and Direction widget allows you to change the way coordinates are displayed in
the coordinate text box. The Format Input and Add Point
tools are located by the Start Point
and End Point for the line tab, and Centre Point for the
circle, ellipse and range rings
tabs.
- 1. Click the Format Input button next to any coordinate text box to open the Set
Coordinate Format String window.
- 2. Click the drop-down menu and choose a coordinate display format.
- 3. Format the coordinate string by adding characters or spaces or removing components
of the string in the text box.
- 4. Optionally check the box to add a + or - prefix to positive or negative numbers.
- 5. Click OK.
Edit symbology
You can edit the symbology of a line, circle, ellipse, or range ring. Each tab has a
Symbol and label settings
section that provides the option to change how graphics are displayed.
- 1. In the Symbol and label settings section, click Symbology
Preview and make
changes.
- 2. For Label colour and size, click the colour picker to set the colour
and use the
text box to set the text size used to label a graphic.
Create lines
You can create lines using the Distance and Direction widget given a distance and bearing,
from known coordinates, or by interactively selecting points.
Create lines from distance and bearing
Create lines from a given distance and bearing.
- 1. Click the Line tab.
- 2. Click the from menu and choose Distance and
Bearing.
- 3. Set a start point by entering coordinates in the Start Point text
box and pressing
Enter or use the Add Point tool to interactively select a point.
- 4. Optionally use the Format Input button to open the Set
Coordinate Format String
window.
- 5. Enter a value for Length and set the units.
- 6. Enter a value for Angle and set the units.
- 7. Click OK.
Create lines from coordinates
Use known coordinates to create geodesic lines.
- 1. Click the Line tab.
- 2. Click the from menu and choose Points.
- 3. Set a start point by entering coordinates in the Start Point text
box and pressing
Enter or use the Add Point tool to interactively select a point.
- 4. Optionally use the Format Input button to open the Set
Coordinate Format String
window.
- 5. Set an end point by entering coordinates in the End Point text box
and pressing Enter
or use the Add Point tool to interactively select a point.
- 6. Optionally use the Format Input button to open the Set
Coordinate Format String
window.
- 7. If you typed coordinates for the start and end points, click OK to
create the line.
Create lines interactively
Interactively create geodesic lines on the map.
- 1. Click the Line tab.
- 2. Click the from menu and choose Points.
- 3. Check the Create Line Interactively box.
- 4. Click the Draw Line tool.
- 5. Click a location on the map to designate the line starting point.
- 6. Click a second point on the map to designate the line ending point.
Create circles
You can create circles using the Distance and Direction widget from known coordinates,
interactively, or from a given time and speed.
Create circles from known coordinates
Use known coordinates to create circles using radius or diameter lengths.
- 1. Click the Circle tab.
- 2. Click the Create Circle From menu and choose Radius
or Diameter.
- 3. Set a centre point by entering coordinates in the Centre Point
text box and
pressing Enter or use the Draw Circle tool to interactively select a
point.
- 4. Enter a distance in the Radius or Diameter text box
and choose the desired units.
- 5. Click OK.
Create circles interactively
Interactively create circles by clicking the map.
- 1. Click the Circle tab.
- 2. Click the Create Circle From menu and choose Radius
or Diameter.
- 3. Check the Create Circle Interactively box.
- 4. Click the Radius/Diameter units menu to set the distance units.
- 5. Click the Draw Circle tool.
- 6. Click a point on the map to designate the circle's centre.
- 7. Click a second point on the map to designate the circle's radius or diameter.
Create circles using speed and time
Create a circle to identify potential locations for moving objects using a centre point,
time, and speed.
- 1. Click the Circle tab.
- 2. Click the Create Circle From menu and choose Radius
or Diameter.
- 3. Set a centre point by entering coordinates in the Centre Point text
box and pressing
Enter, or use the Draw Circle tool to interactively select a point.
- 4. Expand Distance Calculator to enter the other options.
- 5. Enter a value for Time and set the units.
- 6. Enter a value for Rate and set the units.
- 7. Click OK.
Create ellipses
The Distance and Direction widget can create ellipses from either known coordinates or
interactively.
Create ellipses from known coordinates
You can use known coordinates to create ellipses.
- 1. Click the Ellipse tab.
- 2. Click the Ellipse Type menu and choose either Semi
or Full.
- 3. Set a centre point by entering coordinates in the Centre Point text
box and pressing
Enter or use the Draw Ellipse tool to interactively select a point.
- 4. Enter values for the Major and Minor axes in the
Axis section and choose a value
from the
Units menu.
- 5. Enter a value for Orientation Angle and set the units.
- 6. Click OK.
Create ellipses interactively
Interactively create ellipses by clicking the map.
- 1. Click the Ellipse tab.
- 2. Click the Ellipse Type menu and choose either Semi
or Full.
- 3. Check the Create Ellipse Interactively box.
- 4. Click the Unit menu in the Axis section to change
the axis units.
- 5. Click the Draw Ellipse tool.
- 6. Click a point on the map to designate the ellipse centre.
- 7. Drag the pointer and click the map to designate the ellipse major axis length and
orientation.
- 8. Drag and click the map to designate the ellipse minor axis length.
Create range rings interactively
Interactively create range rings by clicking the map.
- 1. Click the Rings tab.
- 2. Click the Type menu and choose Interactive.
- 3. Use the Distance Units menu to set the units.
- 4. Type a value in the Number of Radials text box.
- 5. Click the Add Point tool.
- 6. Click the map to designate a centre point.
- 7. Drag the pointer and click the map to designate the first ring.
- 8. Add more rings as needed.
- 9. Double-click the map to complete the range rings.
Create range rings using a fixed ring number and distance
Create range rings using a set ring number and distance with the Distance and Direction
widget.
- 1. Click the Rings tab.
- 2. Click the Type menu and choose Fixed.
- 3. Set a centre point by entering coordinates in the Centre Point text
box and pressing
Enter, or use the Add Point tool to interactively select a point.
- 4. Type a value in the Number of Rings text box.
- 5. Type a value in the Distance Between Rings text box and set the
desired units.
- 6. Type a value in the Number of Radials text box.
- 7. Click OK.
Create range rings based on an origin and distance from the origin
- 1. Click the Rings tab.
- 2. Click the Type menu and choose Origin.
- 3. Set a centre point by entering coordinates in the Centre Point text
box and pressing
Enter, or use the Add Point tool to interactively select a point.
- 4. Use the Distance Units menu to set the units.
- 5. Enter a value in the Distances text box to set how far the first
ring will be from the origin point.
- 6. Click the add button to add another value and continue to add values as necessary.
- 7. Optionally hover over a value and click the delete button to delete that value.
- 8. Type a value in the Number of Radials text box.
- 9. Click OK.
Create range rings by distance between rings
Create range rings based on an origin and distance from the previous ring.
- 1. Click the Rings tab.
- 2. Click the Type menu and choose Cumulative.
- 3. Set a centre point by entering coordinates in the Centre Point text
box and pressing
Enter, or use the Add Point tool to interactively select a point.
- 4. Use the Distance Units menu to set the units.
- 5. Enter a value in the Distances text box to set how far the first
ring will be from the origin point.
- 6. Click the add button to add another value and continue to add values as necessary.
- 7. Optionally hover over a value and click the delete button to delete that value.
- 8. Optionally hover over a value and click the up or down arrow to reorder the values.
- 9. Type a value in the Number of Radials text box.
- 10. Click OK.

 is not romanized and
it indicates the absence of a vowel
after the consonant.
is not romanized and
it indicates the absence of a vowel
after the consonant.